Unity Asset Store에서 구매 가능한 유료 치트 방지 플러그인이다.
크게 ObscuredTypes, ObscuredPrefs, ObscuredFile, ObscuredFilePrefs 4가지로 나눠져있다.
하나 씩 예제 코드와 함께 살펴보자.
ObscuredTypes
- Cheat Engine, ArtMoney, GameCIH 등과 같은 모든 메모리 검색기에서 변수를 숨김.
- 모든 기본 타입 및 소수의 유니티 타입들을 커버한다.
- 모든 플랫폼에서 작동. (PC, Mac, iOS, Android, WP8, WinStore)
- ObscuredCheatingDectector를 통한 임의 변조 감지 기능이 있다.
보호 기능이 없는 간단한 코드를 상상해 보자. (lives 변수 참고)
using UnityEngine;

public class ObscuredVars : MonoBehaviour
{
    private int lives = 5;

    private void OnGUI()
    {
        GUILayout.BeginArea(new Rect(5, 5, Screen.width - 10, Screen.width - 10));

        if (lives > 0)
        {
            GUILayout.Label("Lives: " + lives);

            if (GUILayout.Button("Kill player", GUILayout.ExpandWidth(false)))
            {
                lives--;
            }
        }
        else
        {
            GUILayout.Label("Game over!");

            if (GUILayout.Button("Start new game", GUILayout.ExpandWidth(false)))
            {
                lives = 5;
            }
        }

        GUILayout.EndArea();
    }
}
일반적으로 치터들은 변수를 찾을 때까지 검색을 반복한다.
아무런 보호 장치가 없다면, 이렇게 찾은 변수를 쉽게 조작할 수 있다.
ACTk을 사용해 변수를 보호하자.
간단하게 int형을 ObscuredInt형으로 교체하자.
public class ObscuredVars : MonoBehaviour
{
    private ObscuredInt lives = 5;

    private void OnGUI()
    {
        GUILayout.BeginArea(new Rect(5, 5, Screen.width - 10, Screen.width - 10));

        if (lives > 0)
        {
            GUILayout.Label("Lives: " + lives);

            if (GUILayout.Button("Kill player", GUILayout.ExpandWidth(false)))
            {
                lives--;
            }
        }
        else
        {
            GUILayout.Label("Game over!");

            if (GUILayout.Button("Start new game", GUILayout.ExpandWidth(false)))
            {
                lives = 5;
            }
        }

        GUILayout.EndArea();
    }
}
이제 해당 타입을 어느정도 보호했지만,
치터가 가짜 사본을 찾고 수정하는 것을 허용할 수 있다.
ObscuredCheatingDetector를 사용하여 부정 행위를 탐지해보자.
Cheater 감지에 대한 반응을 구현하고 Start함수에서 탐지기를 작동하자.
public class ObscuredVars : MonoBehaviour
{
    private ObscuredInt lives = 5;
    private bool cheaterDetected = false;

    private void Start()
    {
        ObscuredCheatingDetector.StartDetection(OnCheaterDetected);
    }

    private void OnCheaterDetected()
    {
        cheaterDetected = true;
    }

    private void OnGUI()
    {
        GUILayout.BeginArea(new Rect(5, 5, Screen.width - 10, Screen.width - 10));

        if (lives > 0)
        {
            GUILayout.Label("Lives: " + lives);

            if (GUILayout.Button("Kill player", GUILayout.ExpandWidth(false)))
            {
                lives--;
            }
        }
        else
        {
            GUILayout.Label("Game over!");

            if (GUILayout.Button("Start new game", GUILayout.ExpandWidth(false)))
            {
                lives = 5;
            }
        }

        GUILayout.EndArea();
    }
}
이렇게 하면 부정 행위 시도가 감지되며 변수는 안전합니다!
ObscuredPrefs
- 저장된 모든 데이터 암호화.
- 변조 감지.
- 저장된 데이터를 현재 디바이스에 잠금.
- PlayerPrefs에서 자동으로 마이그레이션 됨.
- 추가 유형을 지원.
- 모든 플랫폼에서 작동. (PC, Mac, iOS, Android, WP8, WinStore)
보호 기능이 없는 간단한 코드입니다. (PlayerPrefs 사용법 참고)
using UnityEngine;

public class ObscuredPrefsExample : MonoBehaviour
{
    private int lives = 5;

    private void OnGUI()
    {
        GUILayout.BeginArea(new Rect(5, 5, Screen.width - 10, Screen.width - 10));
        OutputLivesWithKillButton();

        if (GUILayout.Button("Save lives", GUILayout.ExpandWidth(false)))
        {
            PlayerPrefs.SetInt("player lives", lives);
        }

        if (GUILayout.Button("Load lives", GUILayout.ExpandWidth(false)))
        {
            lives = PlayerPrefs.GetInt("player lives", lives);
        }

        GUILayout.EndArea();
    }

    private void OutputLivesWithKillButton(){}
}
이렇게 노출된 PlayerPrefs는 변조 되기 쉽다.
다음은 ACTk를 사용한 ObscuredPrefs를 살펴보자.
사용법은 간단하게 PlayerPrefs를 ObscuredPrefs로 교체하면 된다.
using UnityEngine;
using CodeStage.AntiCheat.Storage;

public class ObscuredPrefsExample : MonoBehaviour
{
    private int lives = 5;

    private void OnGUI()
    {
        GUILayout.BeginArea(new Rect(5, 5, Screen.width - 10, Screen.width - 10));
        OutputLivesWithKillButton();

        if (GUILayout.Button("Save lives", GUILayout.ExpandWidth(false)))
        {
            ObscuredPrefs.Set("player lives", lives);
        }

        if (GUILayout.Button("Load lives", GUILayout.ExpandWidth(false)))
        {
            lives = ObscuredPrefs.Get("player lives", lives);
        }

        GUILayout.EndArea();
    }

    private void OutputLivesWithKillButton(){}
}
추가적으로 부정 행위 감지 콜백을 추가하고 적절한 반응을 구현할 수 있다.
public class ObscuredPrefsExample : MonoBehaviour
{
    private int lives = 5;
    private bool cheated = false;

    private void Start()
    {
        ObscuredPrefs.NotGenuineDataDetected += OnCheatingDetected;
    }

    private void OnCheatingDetected()
    {
        cheated = true;
    }

    private void OnGUI()
    {
        GUILayout.BeginArea(new Rect(5, 5, Screen.width - 10, Screen.width - 10));
        OutputLivesWithKillButton();

        if (cheated)
        {
            GUILayout.Label("Cheater!");
        }

        if (GUILayout.Button("Save lives", GUILayout.ExpandWidth(false)))
        {
            ObscuredPrefs.Set("player lives", lives);
        }

        if (GUILayout.Button("Load lives", GUILayout.ExpandWidth(false)))
        {
            lives = ObscuredPrefs.Get("player lives", lives);
        }

        GUILayout.EndArea();
    }

    private void OutputLivesWithKillButton(){}
}
ObscuredFile
- 중요한 데이터를 보호하기 위한 파일 암호화 옵션이 있다.
- 파일 편집 시도를 포착하는 변조 감지 기능이 내장되어 있다.
- 실제 데이터 손상으로 인한 오탐 방지
- 암호화 및 일반 모드 모두에서 사용할 수 있다.
- 추가 구성 없이 이벤트만 수신만으로 가능.
- 다른 장치의 데이터를 감지하거나 완전히 방지하는 장치 잠금 옵션이 있다.
- 사용자 정의 ID 옵션. (이메일, 사용자 이름 등)
- 암호화 및 일반 모드 모두에서 사용할 수 있다.
ObscuredFile 요약
- 선택적으로 데이터를 암호화.
- 선택적으로 데이터를 장치 또는 사용자 지정 ID에 잠금.
- 변조 시도를 감지.
- 백그라운드 스레드에서 사용 가능.
- 플랫폼 제한이 없음.
간단한 사용 예:
public class ObscuredFileExample : MonoBehaviour
{
    private void Start()
    {
        var safeFile = new ObscuredFile();

        //write data:
        var writeResult = safeFile.WriteAllBytes(Encoding.UTF8.GetBytes("Some protected data"));
        if(writeResult.Success)
            Debug.Log($"Data saved to {safeFile.FilePath}");
        else
            Debug.Log($"Someting went wrong while writing data: {writeResult.Error}");

        //read data:
        var readResult = safeFile.ReadAllBytes();
        if (readResult.Success)
        {
            // process readResult.Data;
        }
        else if (readResult.CheatingDetected)
        {
            // punish cheaters
            // differentiate using DataFromAnotherDevice and DataIsNotGenuine readResult properties
        }
        else
        {
            // something went wrong and Data wasn't read
            Debug.LogError($"Something went wrong while reading data: {readResult.Error}");
        }
    }
}
ObscuredFilePrefs
- ObscuredFile의 파워와 유연성.
- PlayerPrefs의 단순성과 사용 용이성.
- Prefs들을 List로 사용할 수 있음.
간단한 사용 예:
public class ObscuredFileExample : MonoBehaviour
{
    private void Start()
    {
        // first, let's init ObscuredFilePrefs and load existing prefs
        ObscuredFilePrefs.Init(true);

        // now, let's add cheating trigger listeners
        // I'll use same listener for both event in sake of demo simplicity
        ObscuredFilePrefs.NotGenuineDataDetected += CheaterDetected;
        ObscuredFilePrefs.DataFromAnotherDeviceDetected += CheaterDetected;

        // few silly prefs for demo purposes
        const string playerHealthKey = "Player health";
        const string playerSessionStart = "Player session start";

        // this is how you can set prefs using generics
        ObscuredFilePrefs.Set(playerHealthKey, 100);
        ObscuredFilePrefs.Set(playerSessionStart, DateTime.Now);

        // getting prefs is easy as well
        var loadedHealth = ObscuredFilePrefs.Get(playerHealthKey, 0);
        var loadedSessionStart = ObscuredFilePrefs.Get(playerSessionStart, DateTime.MinValue);

        Debug.Log($"{playerHealthKey}: {loadedHealth}");
        Debug.Log($"{playerSessionStart}: {loadedSessionStart}");
    }

    private void CheaterDetected()
    {
        Debug.Log("Cheater!");
    }
}
반복문 사용:
// iterating prefs is really easy as well:
var allPrefs = ObscuredFilePrefs.GetKeys();
foreach (var pref in allPrefs)
{
    Debug.Log(pref);
}
SpeedHackDetector
- 스피드핵을 감지한다.
- 오탐을 방지하기 위한 쿨다운 기능이 있다.
- 시간 변경을 준수한다.
- 모든 플랫폼에서 작동. (PC, Mac, iOS, Android, WP8, WinStore)
SpeedHack이란?
먼저 스피드 핵이 어떻게 작동하는지 보자.
씬의 큐브에서 이러한 회전 스크립트를 상상해 보자.
public class SpeedHackDetecting : MonoBehaviour
{
    private void Update()
    {
        transform.Rotate(Vector3.up, 60f * Time.deltaTime);
    }
}
이 코드는 치터가 치트엔진을 통해 스피드를 쉽게 바꿀 수 있다.
이러한 치트는 예방이 안되지만 감지 및 대응은 가능하다!
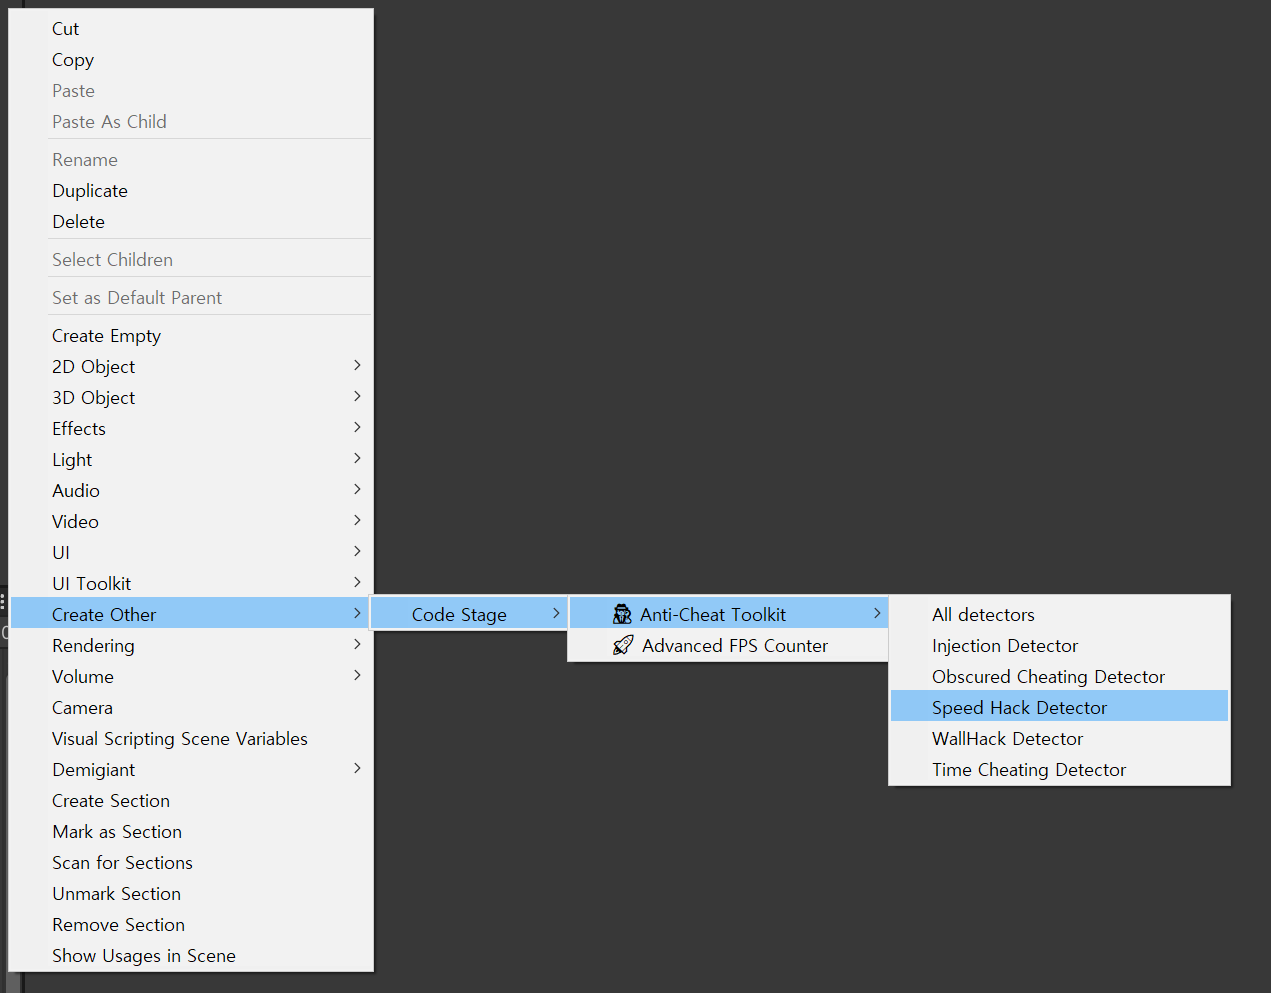
먼저 Hierarchy 메뉴에서 스피드핵 디텍터 오브젝트를 만들자.
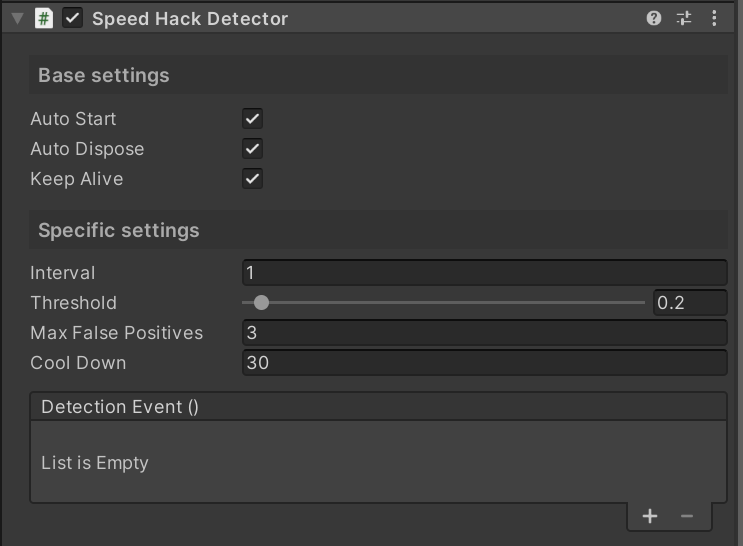
이제 인스펙터에서 감지기를 구성하고 이벤트 콜백을 할당하기만 하면 된다.
예를 들어 부정 행위 감지 시 게임을 멈추고 팝업을 띄우는 식의 대응이 가능하다.
코드에서 이 작업을 수행할 수 있다.
public class SpeedHackDetecting : MonoBehaviour
{
    private bool cheater = false;

    private void Start()
    {
        SpeedHackDetector.StartDetection(OnSpeedHackDetected);
    }

    private void OnSpeedHackDetected()
    {
        cheater = true;
    }
}
간단하게 Start 함수에서 StartDetection을 해주는 것만으로 스피드핵을 감지할 수 있게 된다.